Woodworking

8042 readers
116 users here now

A handmade home for woodworkers and admirers of woodworkers. Our community icon is submitted by @1985MustangCobra@lemmy.ca whose father was inspired to start woodworking by Norm and the New Yankee Workshop.

founded 2 years ago
MODERATORS
1


The device in front is a pretty standard tool for slashing dough for baking. I did not like it at all.

The blade sits out in the open and you lose the little sheath that comes with it.
It doesn't give you control. If you want to do a big slash it's fine but if you want to get ornate small cuts it sucks.

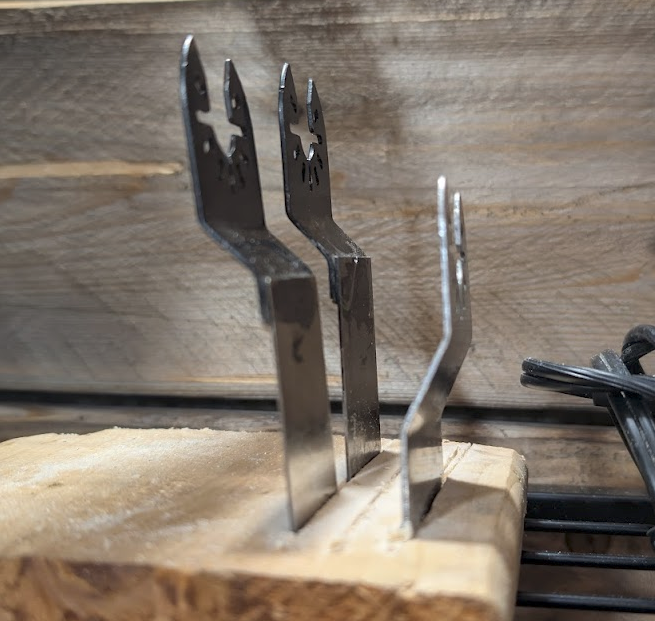
So I started trying different designs in the woodshop. So far I like the second from the bottom first. It's better for my hand size. The blade can be stored in the device when not in use. It allows for fine movements where you can control pressure and angle.

The third from the bottom is just large enough to hold the blade inside when not in use. It's too small for a lot of hands. It requires complete disassembly to store the blade instead of just tucking it inside after loosening the wing nut. Each time you have to touch a blade increases the hazard.

The top one is a mix between two and three. I made it just a hair too small to allow for the blade to just swing inside but it does offer a wide profile for easy control.

These were all made with scraps (maple, cherry, white oak) and stainless steel nuts and bolts. Sealed with Watco butcher block sealant. Cost each was about $2 for hardware because I went with stainless instead of zinc. Going with zinc would get the cost down to under a dollar but for kitchen use I recommend stainless or brass.

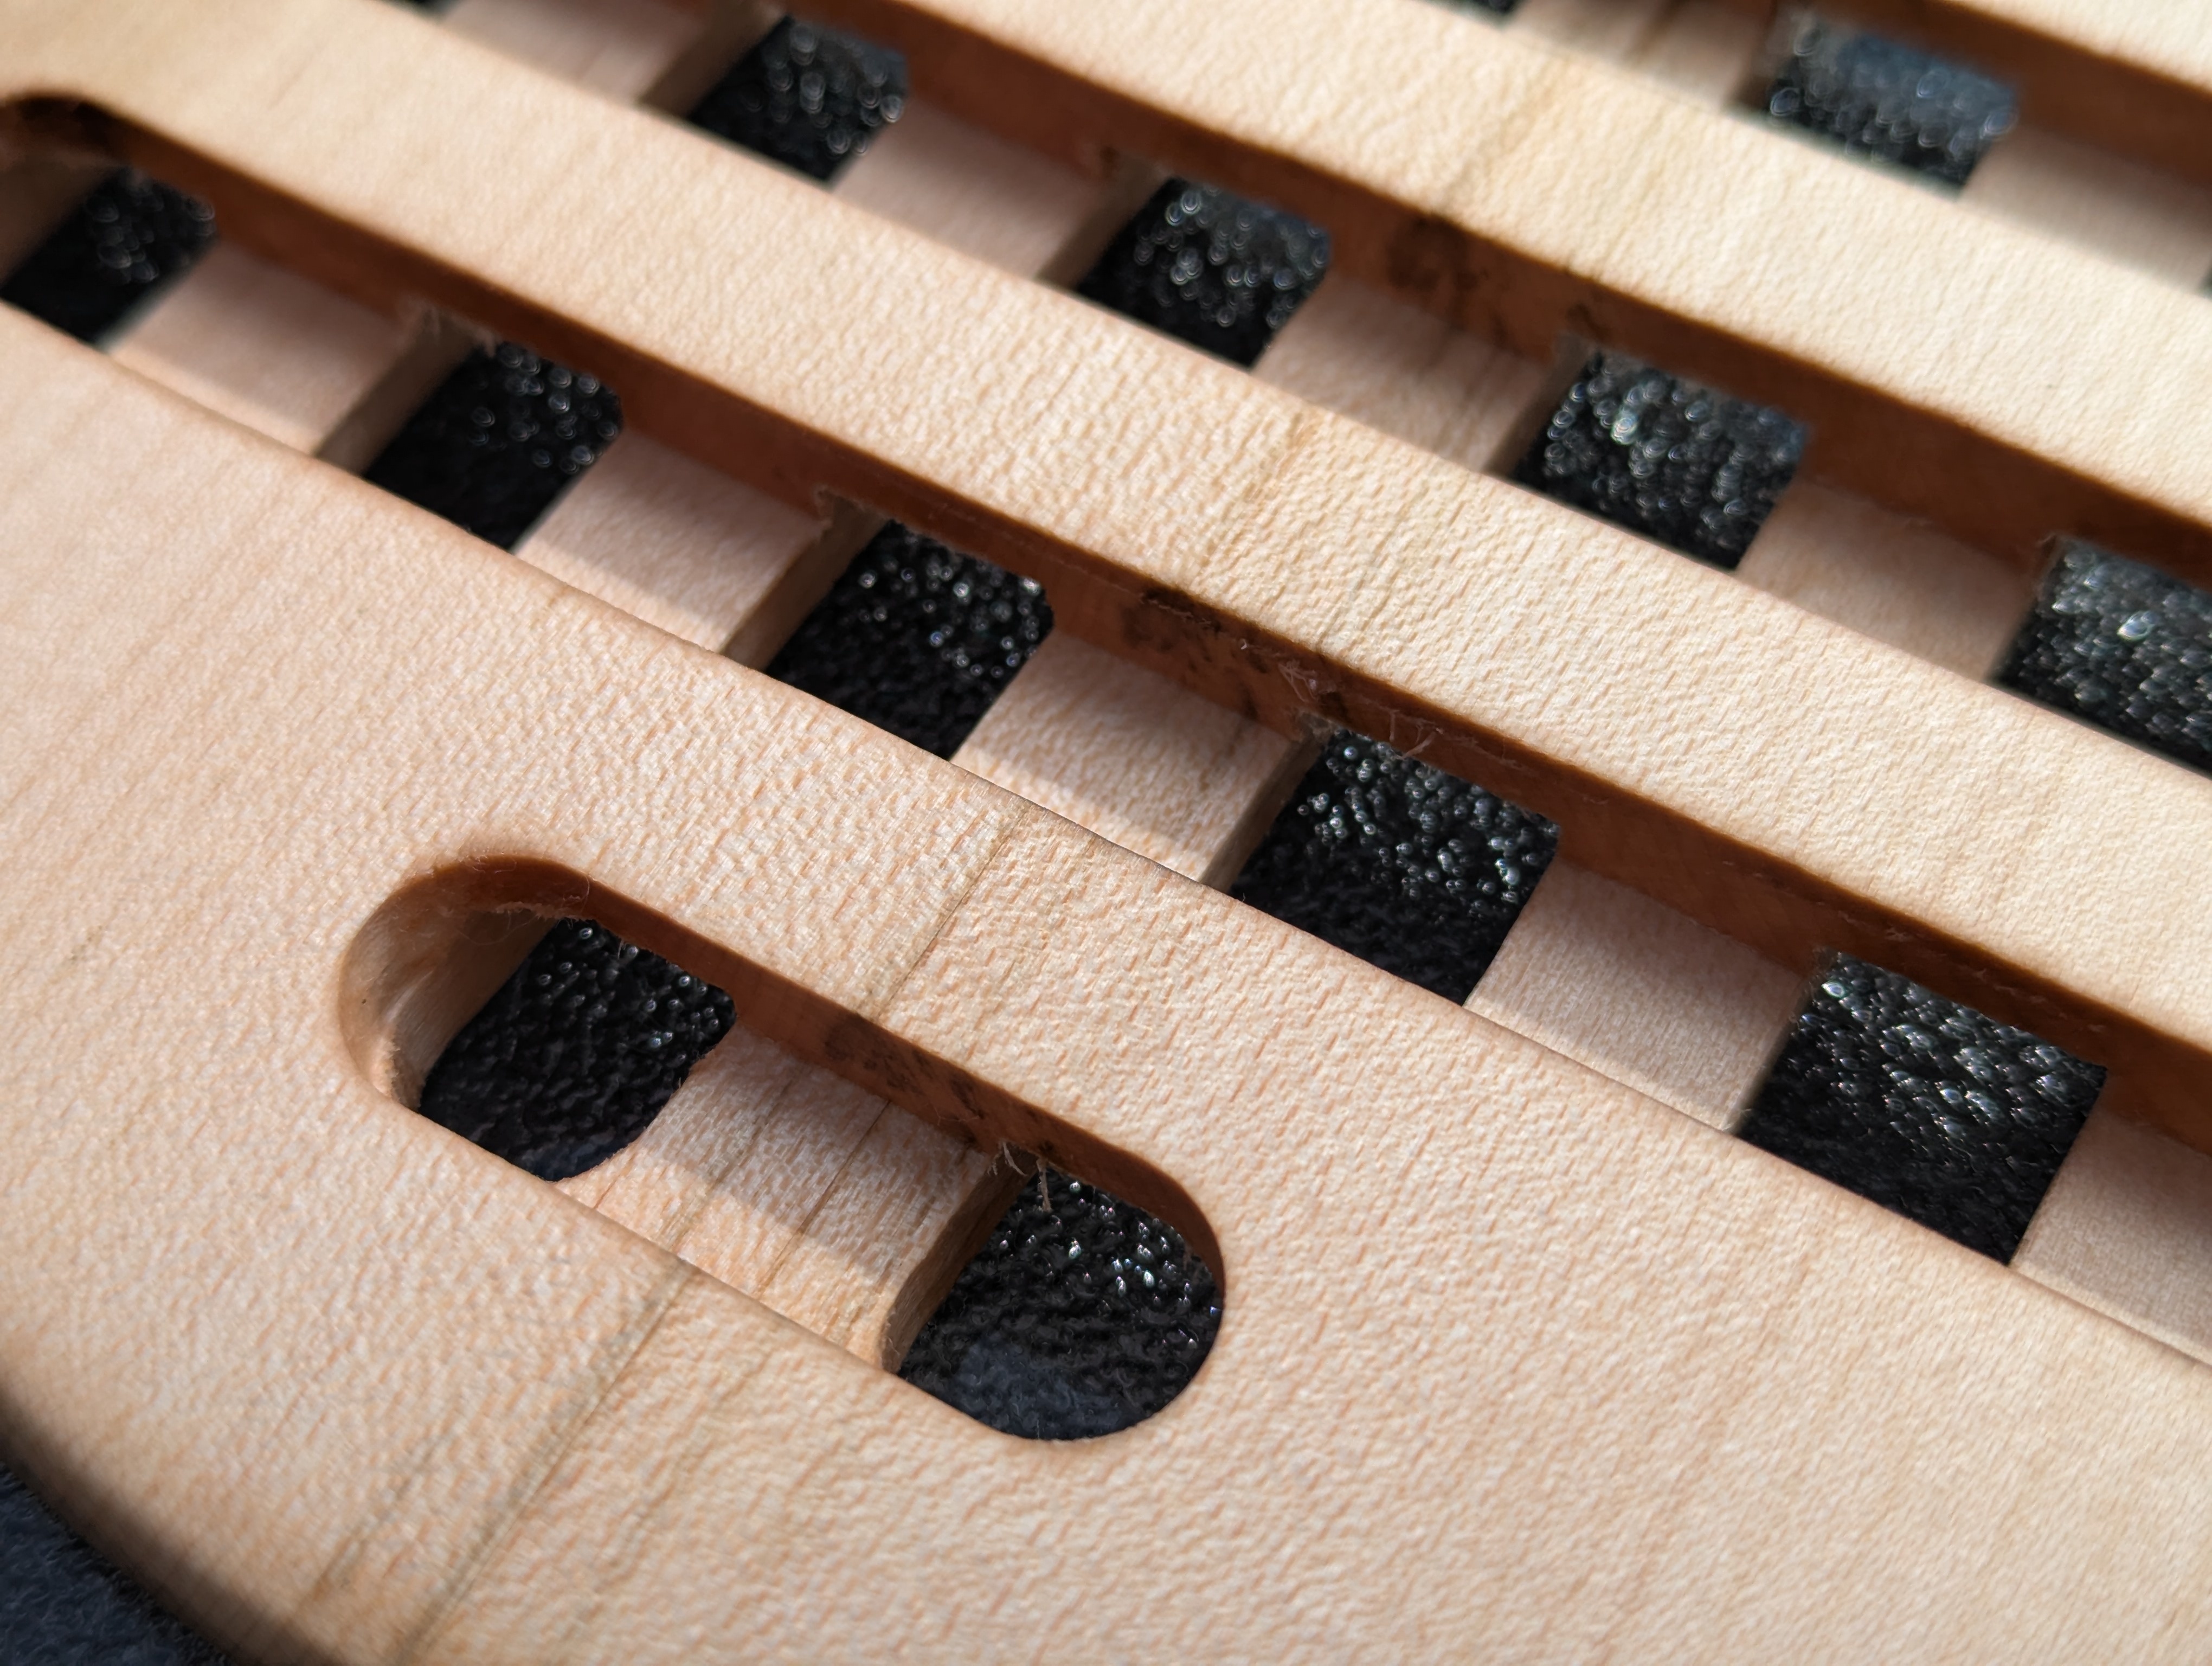
The dough was leftover from a week of pita eating. I'll need to find a use for it other than its current status of experiment fodder.

2


This shed door had outlived its functional life and a client wanted it replaced. I asked "Do you want to just get it done or do it right?"

They picked the right option.

3


The left saw has two kinks, but most of the rust is sanding off pretty well with 220 grit. The right one has a slight bend but no sharp kinks, though it has a fair amount of pitting that's deeper than sandpaper is taking off. I'll probably continue to restore the right one, but curious if folks think they wouldn't be functional.

4


Most of the nuts came out with minimal force, but the last one just spins in place. I tried rubber gloves, painter's tape, and duct tape to get a better grip. I'd rather not cut a slot in the domed nut if there's another good strategy.

The rest of the restoration underway:

5


Researching work benches will often show many examples of the sliding deadman. I opted not to put one on my bench because I valued drawer space more.

On the rare occasion when I need to support a piece from the bottom I'll just use a clamp in expansion mode.

6


Before we kick this off, I was enmoderated on this community a few months ago, and I haven't had to do a single bit of moderation in that time. Not a single user banned, not a single comment deleted. This community has been absolutely excellent to each other, and I sincerely thank each and every one of you for that.

Without further ado, let's have one of our community sidebar picture contests!

It's the holiday season, and I'm sure a few of us woodworkers have hand built some wooden gifts for our friends and loved ones. To enter the contest, please leave a comment on this post with a picture or two of your gift project along with a brief description. The project with the most community upvotes wins.

The prize will be your project displayed on the community sidebar until the next contest (where the New Yankee Workshop sign is at time of writing) and the choice of topic for the next season's contest.

Votes will be tallied on the evening of Dec 24.

Let's see the wonderful stuff y'all made!

7
143
Hand cut Dovetails (lemmy.world)
submitted 1 week ago* (last edited 1 week ago) by fujiwood@lemmy.world to c/woodworking@lemmy.ca


These are not my first dovetails but it has been a while since I've cut them. This set were not very good but I'll slow down for the next ones.

#woodworking #wood #handtools #oc

8


$15 at an estate sale, I was definitely prepared to pay more. I've seen people finding such cool stuff at secondhand shops and had no luck myself, so I'm hoping I can get some life out of these.

Also got a plane (one of the adjustments doesn't work but otherwise looks decent) and a Heath Kit power supply.

9
54
Bookends WIP (lemmy.world)
submitted 1 week ago* (last edited 1 week ago) by fujiwood@lemmy.world to c/woodworking@lemmy.ca


Making some bookeneds by hand.

So far I used hand saws to rough cut and rip the board. Then a shooting board to create flat and perpendicular edges.

A saw and chisel to begin the curved edges. A carving knife to get me close and a spoke shave to give it a smoother curve.

Next will be dovetails.

#woodworking #wood #handtools #oc

10


I found this table on the curb a while back, less the leg hardware. No a relative could use it, and I'm wondering how to fix it up.

Cut a couple 2x4 sections to fill the truncated-triangular area and screw through them into all surfaces?

The legs have a hollow center drilled out, at the top, so I assume some metal piece with threaded holes fit there, and a metal plate anchored that to the skirt (?).

Another view:

11


I have a 6 mm drill bit and a supply of 6.35 mm screws.

Using these, I must fix hardwood to softwood in 100 places.

I can fit a clamp for 90 of these.

How screwed am I?

12


Caption from the video:

How and why I built a mechanical calculator. Basing it on the Arithmometer, I built this calculator by hand out of mostly plywood. I suspect it is the first of its kind built in over 100 years. Working on and off, it took me 8 years.

13
14


I love Rex Krueger's videos, and I was thinking about his planing stop while cleaning up in the shop when i happened upon my collection of 'dull and/or burnt reciprocating tool blades that I won't throw away because who knows' and it occured to me that these are the same shape, and rough size as a screwdown planing stop, while conveniently fitting over a dog, or using the existing holes to screw it down.

15
16


I was thinking while planing my workbench to level it..."a nice clean shiny workbench is just like a truck that has never seen dirt roads".

17


I hope this is okay to post here. If not, let me know where I should go.

I built a standard table using mostly scrap wood. The top is a very nice piece of half-inch plywood, attached to 2x4 apron surrounding the sides. Legs are screwed into the apron (not mortise and tenoned because I was lazy). I'm typing on it now with a laptop and seems sturdy now but when I put my monitor setup, it becomes very top heavy. Since I tend to "pull" on my desk to move my chair, it would likely topple, which would be very bad™.

I've been frantically searching online of ways to counter-act this and methods don't seem clear as to how they work. For example, some woodworking websites suggest adding cross braces across the legs. The page doesn't explain why this works. I am guessing it spreads the force of weight across the braces towards the back legs?

I also found some plans that show a rising standing desk. Ignoring the moving parts, I saw that the legs were parallel to the desk, joined by what I'll assume is mortise and tenon. This plan seems a bit more doable with the tools I have, and has a similar shape.

My monitor stand also functions as a rising desk and MUST sit on the front of the desk. So the apron is set back roughly 5 inches in the front so that it can clamp in. I estimate it's roughly 20 pounds with the monitors on it. I know I could just buy 20 pounds of weight and put it on the back but given that tables should be tables, I figured I would ask here for suggestions.

I've got family stuff today and I'll try to reply as I am able. Thanks in advanced.

Edit: THANK YOU for all of the suggestions.

I added a cross brace across the back as well as a cross brace on either side of the desk, with a 6" extension. The desk immediately became sturdy with just one brace but I added the second. It held my 200lbs ass on the front without issue.

18


Greetings! I've been getting into tobacco pipe making. This is purely a past time endeavor, just messing around with hand tools and dremel stuff to see how far I get and feel things out. One thing I'm just not getting comfortable with is hand-sawing. I know there's some technique that i probably need to gain, and a proper bench vice would help, but I'm constrained on space. Also my hands get arthritic from time to time.

This got me to thinking on scroll saws since they tend to be cheaper and smaller than band saws. So with it being more budget friendly and space friendly I've really been curious about them. The issue is I'm working with hard woods (briar mostly, but maybe olive and morta in the future) and some of the cuts will be thick, albeit small. I'm sure you can imagine the general size of the blocks I work with. I'd say the thickest parts of a project might go up to heights of 7cm, and on those taller cuts the length may be up to 5cm. Do any of ya'll experienced in using scroll saws have any thoughts on this? Is this absolutely the wrong tool for the job, or could it work with a little patience? I don't mind if it's a matter of going slow and keeping a deep supply of fresh blades. I'm only doing 2-3 projects a month.

If it helps, what I'm eyeing is the proxxon ds 230 or something like it.

19
 
 
20
21


The third step, burnishing the edge, at a slight angle towards the face “turns the burr upwards”. The SEM clearly shows a blade-like bevel has been formed, perpendicular to the card face. However, rather than simply turning the burr, metal has been reformed, and the burr has buckled rather than rotating. Additionally, the burnishing rod has honed the side of the bevel, removing metal just as a honing rod removes metal to restore a knife edge.

I've been struggling to sharpen my card scraper, and was happily surprised to see that scienceofsharp.com has an article (from 2019) that helps visualize the burr structure.

22


I haven't gotten around to making a nice board with slots for each hone, and for some reason this setup wasn't obvious to me so I thought I'd share. Front is against a bench dog, back is pressed against the rubber foot of the edge of the bench. It is easy to swap in the different hones, and doesn't scoot around.

(Still figuring out how to put a burr on that card scraper though.)

23


I hope it’s not against the rules here, just saw this woodworking related xkcd that I enjoyed and thought it might be appreciated here:)

https://xkcd.com/3138

24
25


Similar to the one I made in oak, the other piece of hardwood board I had for this project was ash.

detail view

The jig was a bit cobbled together, which mostly worked fine for doing 2 of them. The 1-inch spacer did slip, which is where the divot I was filling with sawdust came from. Doing any more of them I'd definitely want a more thought-out jig (or CNC).

jig

Back

I initially had a lot of burning on test pieces. Turned out my router bit just got dull a lot faster than I expected, and after sharpening on a DMT it cut fine without any special care to speed.

test cuts

I put butcher block conditioner on it, though I didn't know if that's enough to protect it from dirty pans.

view more: next ›